Package content
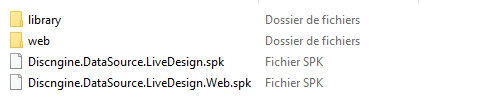
| /library | Contains the entry point document to be imported in the Spotfire Library |
| /web | The gadget application to be deployed on the LiveDesign server |
| Discngine.DataSource.LiveDesign.spk | The LiveDesign Connector Spotfire extensions for the DataSource, for Analyst |
| Discngine.DataSource.LiveDesign.Web.spk | The LiveDesign Connector Web Player extensions, for Web Player |
| Discngine.LiveDesign.Connector.sdn | The Spotfire Distribution package that simplifies the deployment of both extensions |
This package is available here.
Prerequisite
- Spotfire
- Version 11.4+ or 12+
- Administrator group membership and remote access to the Spotfire server
- LiveDesign
- Version 8+, 9+, 2022+ or 2023+
- Administrator role and SSH access to the LiveDesign server
Spotfire
1 - Deploy the sdn file OR deploy all .spk to your area using the Spotfire administration tool
At the end you must have these extensions activated:
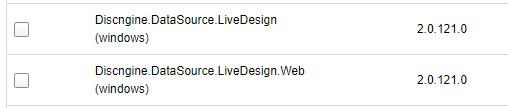
If the Discngine Spotfire Connector for BIOVIA® Pipeline Pilot is already installed on the area, its version must be 5.6 or higher.
Fill Spotfire preferences as indicated here.
2 - Update the corresponding web player services to install the webplayer tool
See Spotfire official documentation for more information
3 - Update the webplayer configuration:
- Spotfire configuration tool cli reference
- Spotfire configuration export reference
- Spotfire configuration import reference
- Spotfire authorize webplayer write to directory reference
To import data from LiveDesign to Spotfire, the webplayer worker service will needs to write temporary files on the server's %TEMP% directory.
To get the temporary folder of the Spotfire nodemanager service:
- if the account used is Local Service, Local System, or Network services, or any service account, the default temporary folder is usually
%WINDOWS%\temp - if the account used is a generic account, please contact your System administrator to get the information
Once the temporary folder path is known, open the Spotfire Server directory (not the node manager) to export the service configuration.
Open a shell with elevated rights ("run as administrator")
%SPOTFIRE_HOME%a. Export the current directory for your webworker service area:
%SPOTFIRE_HOME%\tomcat\spotfire-bin> config export-service-config --deployment-area="<Your Area>" --force --capability=WEB_PLAYER
This will create a config directory under the spotfire-bin config:
b. With a text editor using elevated rights, edit the file config\root\Spotfire.Dxp.Worker.Host.exe.config.
In it, search and modify the following section, adding a string element containing the path to the temporary directory you retrieved eariler:
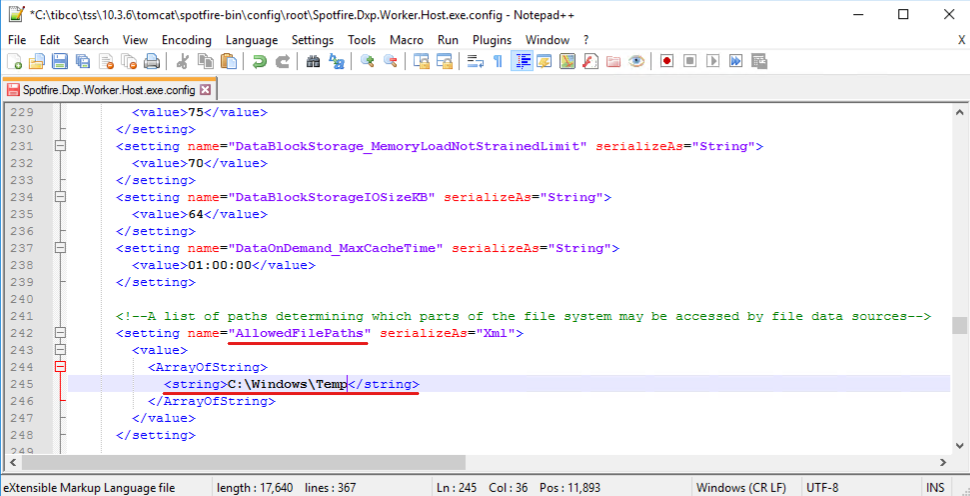
Save the file, and import the config with a new name:
%SPOTFIRE_HOME%\tomcat\spotfire-bin> config import-service-config --config-name="<New Configuration Name>"
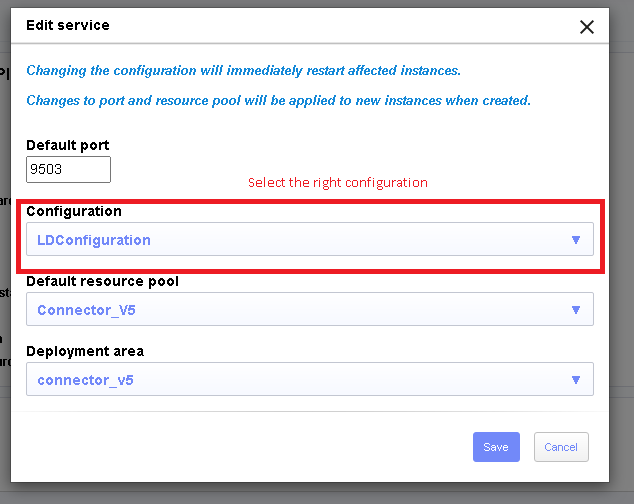
c. Go to the Spotfire administration website, and select the webplayer service for the corresponding area, then click the Edit button:
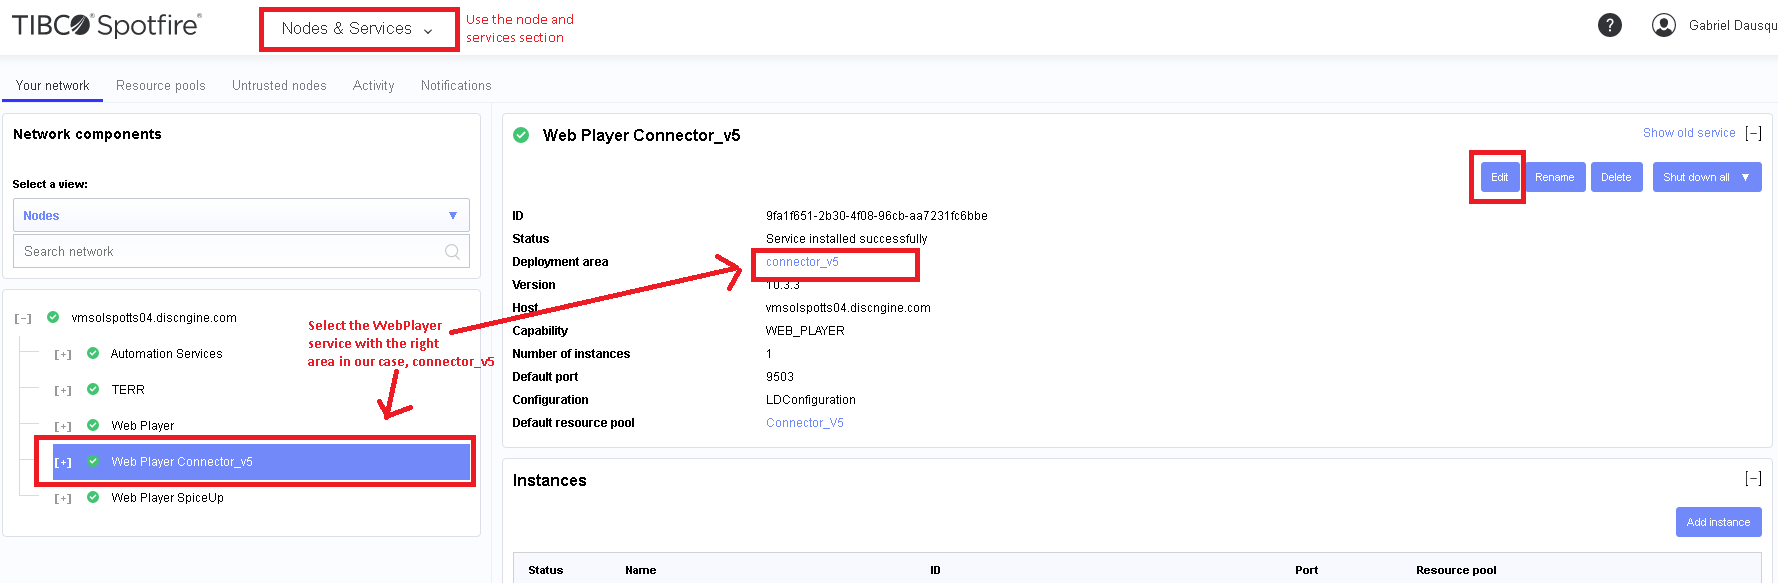
d. Change the configuration using the new one you have just imported and click save. Spotfire will restart the webplayer node:
4 - LiveDesign Connector license activation and preferences
In Spotfire analyst, go to Tools > Administration Manager, and open the Groups and Licenses tab. Activate the following licenses for the final users or groups to who you want to provide access to the LiveDesign Connector tool:
 ;
;
In Spotfire analyst, go to Tools > Administration Manager, and open the Preferences tab. In here, fill the preferences:
| Configuration Key | Required | Default | Description |
|---|---|---|---|
| DefaultDocumentPathOrId | df7b5c3b-935c-4dde-b102-54f44b3b6a6b | When set, specify the spotfire template that will be opened as an empty document in the LiveDesign Connector. | |
| DefaultExportDataTableName | LiveReport Data | When set, define the default name of the datatable where the LiveReport Data is exported from the import assistant, gadget, livedesign connector. | |
| DefaultLibraryPath | ✓ | When set, only the templates in the specified folder and its children will be available in the Gadget. | |
| DefaultPageTitle | "[Default]" | The page that will be opened with light Spotfire interface during automated opening Spotfire template in gadget | |
| ExportInMemory | True | This defineif the LiveDesign export is done in process or out of process, change it if you encountered issues related to RDKit. Beware, out of process is less performant than in process export : it may needs to increase export timeout | |
| ExportTimeoutInSeconds | 360 | The timeout for the first export phase (export from LD to SDF file) in seconds or the run of the load livereports library assistant | |
| ImportInChi | false | When true, a "Structure <InChi>" column containing the InChi of the compound will be generated during export. Default to false. | |
| ImportLiveReportImage | false | When true, a "Structure <LiveReport Image>" column containing the Image of the compound in the LiveReport will be generated during export. Default to false. | |
| ImportMolFile | false | When true, a "Structure <MOLFILE>" column containing the MOLFILE of the compound will be generated during export. Default to false. | |
| ImportPNG | false | When true, a "Structure <PNG>" column containing the PNG of the compound will be generated during export. Default to false. | |
| ImportSmiles | false | When true, a "Structure <Smiles>" column containing the SMILES of the compound will be generated during export. Default to false. | |
| LicenseKey | ✓ | The license key provided by Discngine. | |
| LiveDesignServerUrl | ✓ | The default LiveDesign server URL which will be used to prefill the Data Source connexion screen. | |
| LiveDesignVersion | 8.9 | Specify the version of LiveDesign api to use. See compatibility sheet. Needed if the UsePython is set to true | |
| PeriodBeforeExpiration | The number of days you want to be warned before the license expires. | ||
| PythonVersion | 3.9 | Specifies the version of the python runtime to use. 3.9 (default) and 2.7 are supported. | |
| TempFolder | If set to a fullpath value, will defined the tempfolder used during the export process to generate intermediate. See Below for how to use this preference | ||
| UsePython | false | If set to true it activates the oldest way to talk with LiveDesign, meaning using the python API. You need to set the right LiveDesignVersion flag if you do so |
Example of filled preferences :
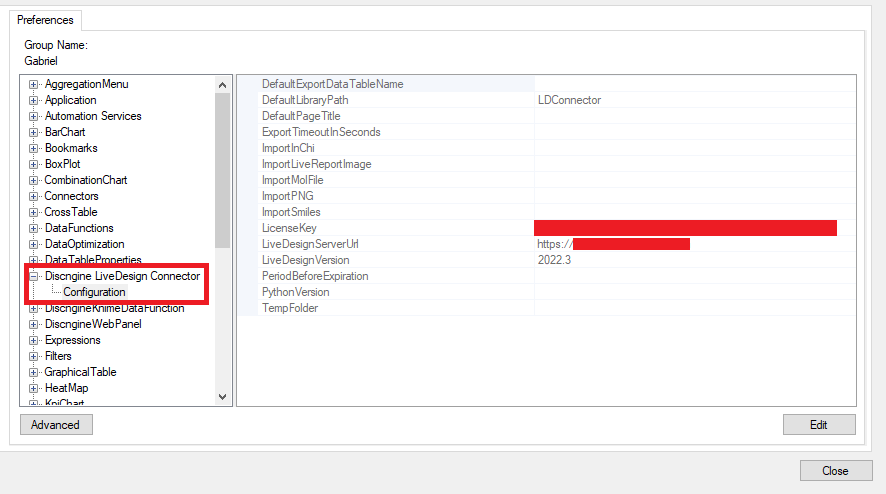
By default the DefaultLibraryPath value must be "LDConnector", but if you change this folder's place, it must be its new path.
The LiveDesignServerUrl value is specific to each environment and must be the URL of the LiveDesign server that should be connected with Spotfire.
What is the TempFolder preference ?
By default, the LiveDesign Spotfire connector does some operation by writing temporary files in the standard temp folder of the account that is running Spotfire:
- if in analyst, it uses the %TMP% folder define for the user profile
- if in web player, it will use the standard temp folder for the service account
Sometimes, you may want to or need to override this default behavior, because :
- you do not want to use the system temp volume
- you are using kerberos + impersonation and needs to set up a custom folder where your users will have write access
If you need to do so, you will have to :
- set up a network shared folder that will be available from your users workstations and windows account AND your webplayer server and service account
- ensure that webplayer service account and all of spotfire users account that use the LiveDesign connector has Read/write/modify access
- set up the full path in the tempfolder preference.
- Restart both spotfire analyst and concerned webplayer service instance
Nb: multiple messages are raised in webplayer and analyst logs to help you diagnose if any issue occurs
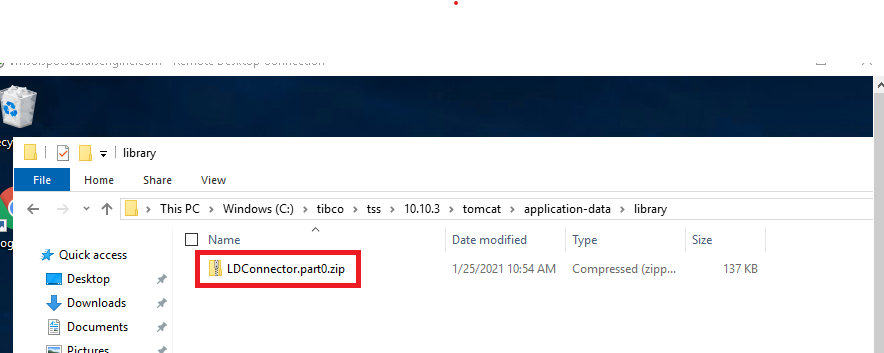
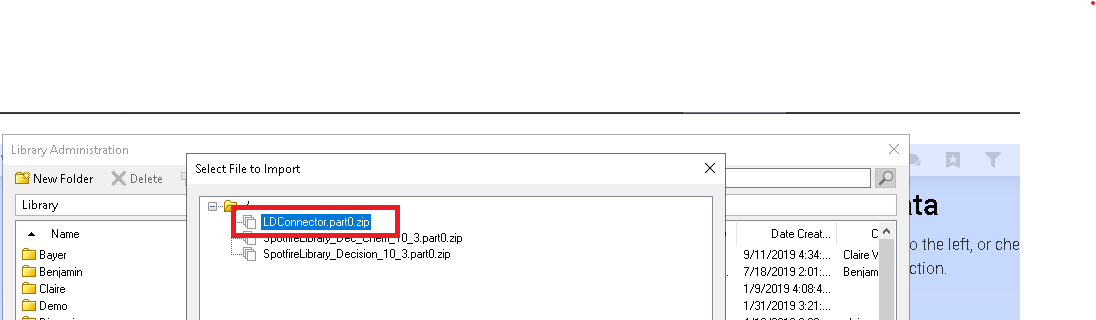
5 - Deploy Entry point document in Spotfire Library
Copy the LDConnector.part0.zip file to your Spotfire server shared folder (by default <Spotfire Root>\tss\<version>\tomcat\application-data\library).
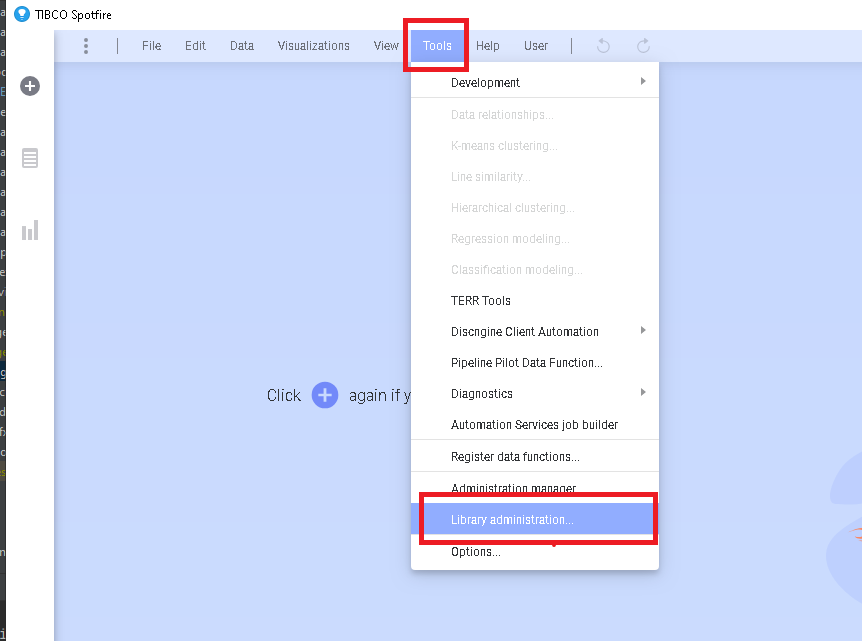
In Spotfire analyst, go to Tools > Library Administration
Click on import and browse to select the LDConnector.part0.zip file:
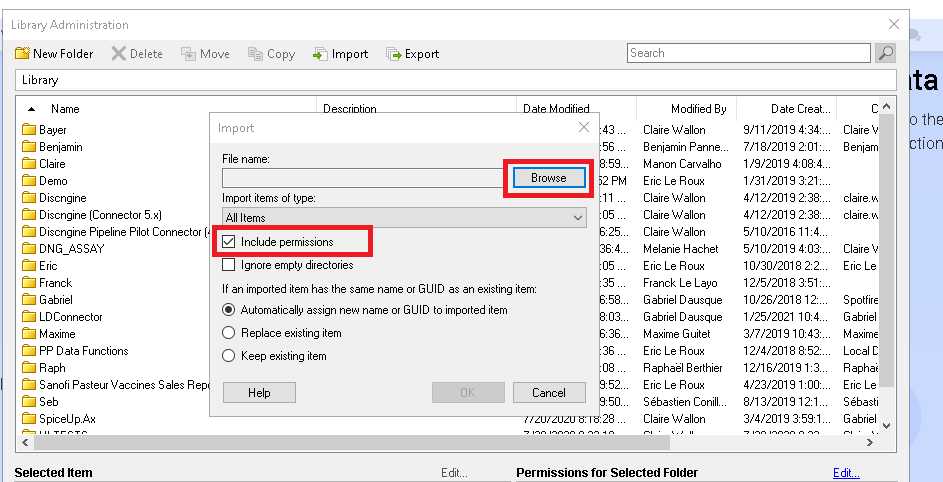
Click on Ok. Check in library but you may have now this file available for Everyone:
Set up access rights on the imported library folder based on following indications :
- All users of the LiveDesign Connector need to have at least Browse + Access rights on the LDConnector folder
- Template designers need to have Browse + Access + Modify rights on the LDConnector folder (later if you need to be more restrictive you can apply these rights on specific Projects folders)
6 - FOR ADMIN ONLY : Troubleshooting and diagnostic tool Configuration
Prerequisite:
- having the spotfire database connection string or at least :
- Spotfire database server name
- Spotfire database name and type (SQL or Oracle)
- Spotfire server database read account and password
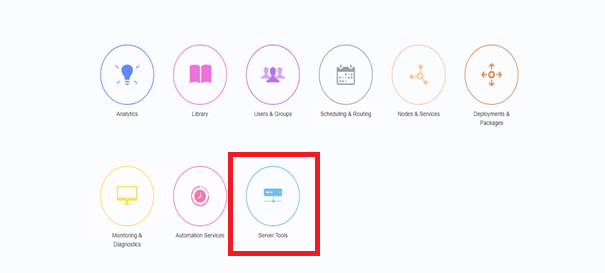
a. Install the Spotfire configuration tool on your workstation
Go to Spotfire admin web portal > ServerTool section and follow the instructions
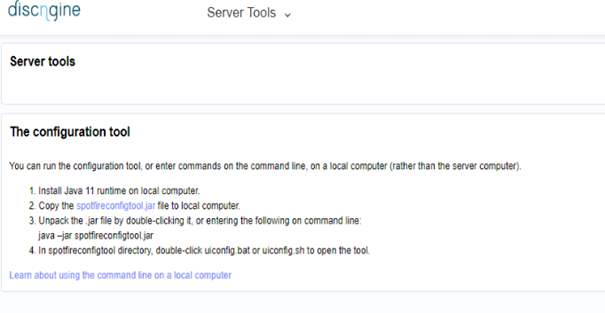
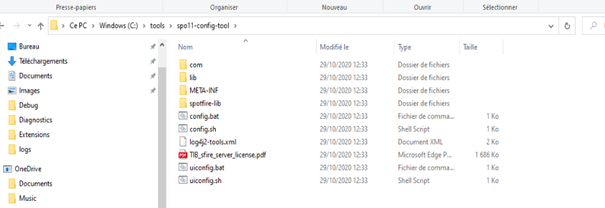
After unzipping the jar file you will have a folder with this content :
b. Configure the tool to connect to your spotfire installation
In the config tool folder, launch the configui.bat, and click on "create new bootstrap file"

Fill the correct information in the edit bootstrap section (check the file name, database server connection information) :
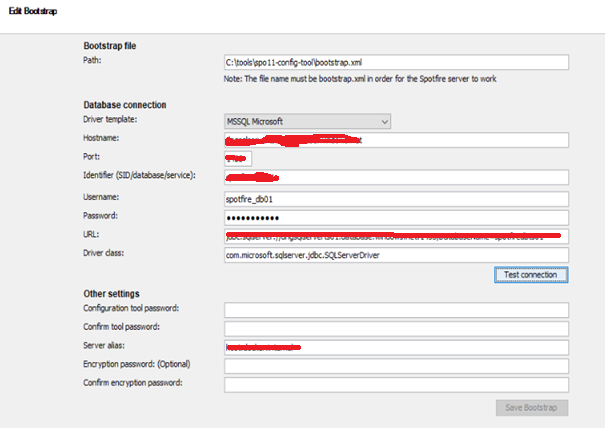
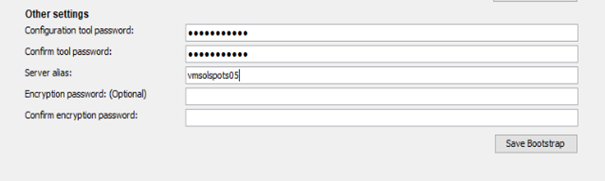
Fill tool's password (mandatory) and save the bootstrap file :
Close the ui.
c. Configure the tool in Spotfire
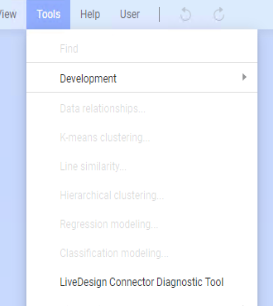
Launch Spotfire, click on the "LiveDesign Connector Diagnostic Tool"
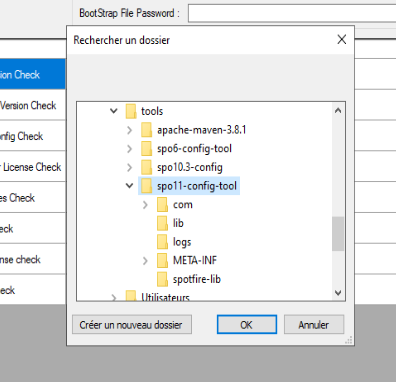
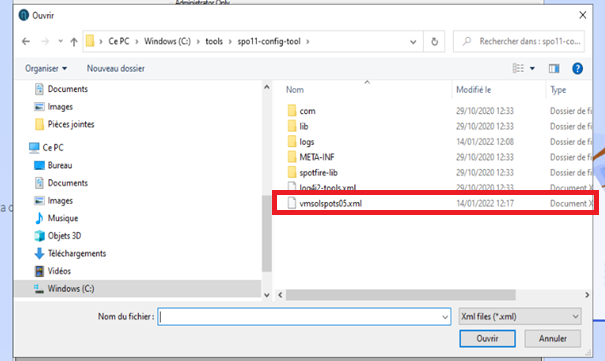
Double click in the "Config tool directory" textbox and select the folder where the config tool has been unzipped :
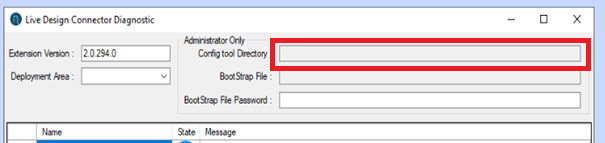
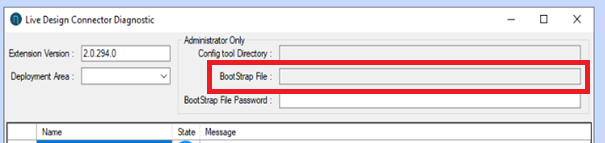
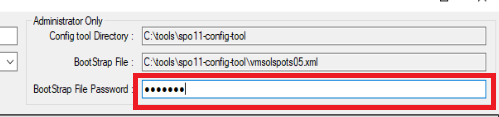
Double click in the "Bootstrap file" textbox and select the bootstrap file you have just saved
Finally fill in the tool password
Close the tool window and relaunch spotfire.
You can now use the diagnostic tool to have information if the LiveDesign connector doesn't work correctly
LiveDesign
As many LiveDesign gadgets, the Spotfire Gadget by Discngine is a web appplication. The current installation procedure is based on a standard LiveDesign installation using nginx as application server.
For the following steps, we assume you have SSH access to your LiveDesign server.
- Copy the content of the
webfolder from the LiveDesign Connector package to the server, under seurat/custom_gagdets directory:
scp -r /path/to/web <user>@<ld_server_url>:/home/seurat/custom_gadgets/ldconnector
- Edit the config file
Use your favourite editor to open the file /home/seurat/custom_gadgets/ldconnector/config/config.json
{
  "visualizer": {
    "url": "<your Spotfire url>"
    "entryPointDocumentIdOrPath": "df7b5c3b-935c-4dde-b102-54f44b3b6a6b"
  },
  "data": {
    "liveDesignServerUrl": "<your LiveDesign url>"
  }
}
- Set your Spotfire server url in the > visualizer > url, e.g. "https://spotfire.mycompany.com"
- Set the id of the entry point document in > visualizer > entryPointDocumentIdOrPath (see below for details)
- Set the LiveDesign url in > data > liveDesignServerUrl, e.g. 'https://livedesign.mycompany.com"
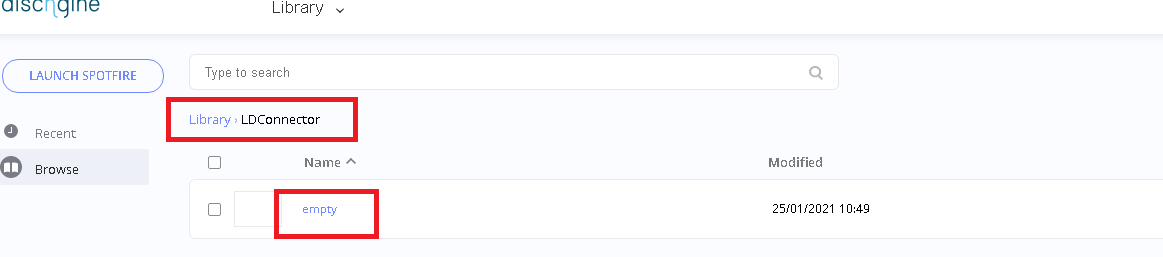
The parameter entryPointDocumentIdOrPath should be the id of the default document that will be used to check the connexion to Spotfire.
We strongly suggest to use the empty document provided in the LDConnector.part0.zip file.
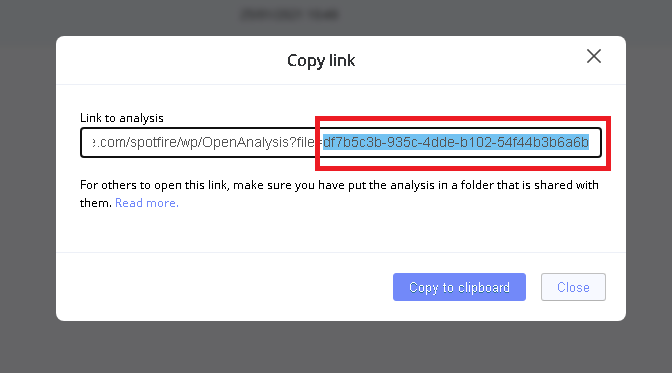
To get the id of the Entry point document:
- Go to the Spotfire Library / LDConnector and click copy link:

- Take the id of the document from the link and use it as
entryPointDocumentIdOrPath:
- Check that the ownership and access rights are correct
sudo chown seurat:seurat -R /home/seurat/custom_gadgets/ldconnector/
# if required:
sudo chmod 755 -R /home/seurat/custom_gadgets/ldconnector/
- Create/Edit the nginx configuration for exposing two location:
Go to the nginx config folder:
cd /etc/nginx/endpoints.d
Create a new config file for the Discngine configuration and open it with your favourite editor:
touch discngine.conf
vi discngine.conf
Then paste the following
location = /livedesign/session {
    default_type text/plain;

    if ( $http_cookie ~ "JSESSIONID=(?<token>[^;]*)" ) {
        return 200 $1;
    }
    return 401;
}

location /livedesign/spo {
    alias /home/seurat/custom_gadgets/ldconnector/;
    index index.html;
}
Save your file and restart nginx:
sudo systemctl restart nginx
- Configure gadget in LiveDesign admin tool
Finally, go to LiveDesign admin tools > Properties > Custom Gadget and declare the gadget
{
  // ... other gadgets
  "Spotfire Gadget by Discngine": "/livedesign/spo"
}
