Installing the SWAPP
The SWAPP (Spotfire Web Application for Pipeline Pilot) is bundled with the Pipeline Pilot package and will be available at https://yourserver:port/discngine/swapp after the package has been installed. It works the same in Analyst and Web Player. However, before using it you will need to set up the required parameters to ensure it works correctly.
Configuring the SWAPP
The SWAPP uses the global variables defined in your Pipeline Pilot server configuration (see Installation Section, point 8 for more details).
Analyst
To access it in the Analyst, set the BaseURL configuration parameter of the Web Panel. The BaseURL can be either a file containing a link or redirection to the SWAPP url, or you can set the BaseURL to be the url of the SWAPP.
Web Player
To access the SWAPP in the Web Player, simply visit the SWAPP url https://yourserver:port/discngine/swapp in your browser. We strongly recommend using a browser compatible with the latest web technologies like Chrome or Firefox.
Permissions
To allow a fine control of the actions a user can perform, the SWAPP uses a system of permission. Three different permissions exist: SWAPP_ADD, SWAPP_EDIT, SWAPP_DELETE. Alternatively, a group Discngine/SWAPP/Administrators is available and encompasses all above permissions.
If you plan on trying the SWAPP and register new protocols, make sure you have the correct permissions set for you.
How to use
Getting started
The SWAPP Menu
Running example protocols
Upon installation, the SWAPP will be fed with a default menu containing example protocols. Almost all protocols require a data table containing a column of molecular structures (e.g. CTAB). To have such a column, you can start by loading the protocol Load Maybridge Data. As you will see in the Pipeline Pilot protocol, it only takes one input parameter of type number, which defaults to 200. This is the number of molecules you want to load from the Maybridge database. Change it or leave it as is, and click submit to execute the protocol.

Once completed, the resulting HTML file from the protocol will be automatically fetched and the new data table will be loaded as well as a table plot.
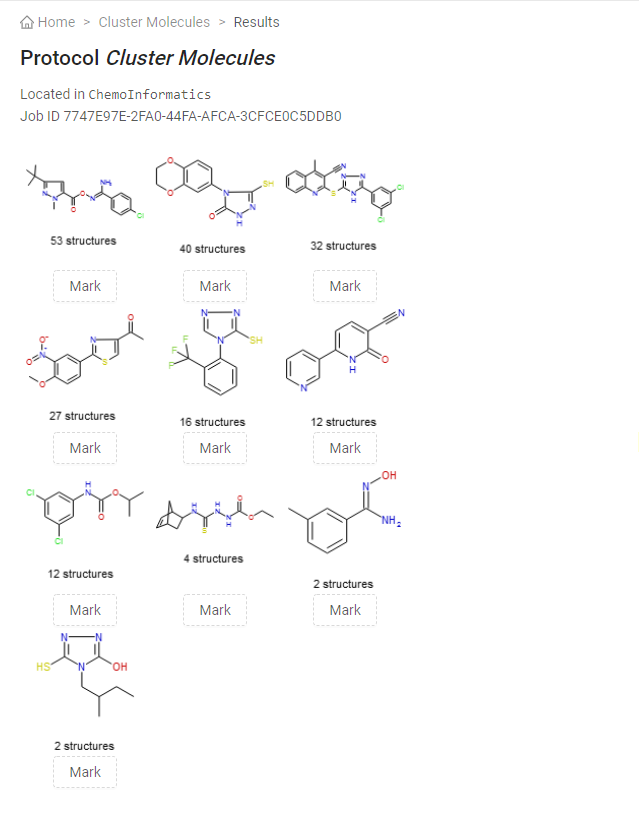
From there, you can try to run another ChemoInformatics protocol. Let's take the Cluster Molecules one as a second example. This one takes one required input parameter: the name of the data table to use as input. This protocols also has Advanced Parameters defined. Click on the Show advanced parameters button to see and modify them if you wish. Submit the protocol and wait for the result to be loaded, which should look like below.

This time the protocol outputs a list of molecules in the SWAPP. New columns have been added to the data table as well as a new Bar Chart. The Mark buttons under each structure can be used to interact with the SWAPP and highlight the relevant rows.
List of protocols
When a protocol is triggered, it is automatically added to the list of jobs. The list can be accessed from the menu by clicking the list button:

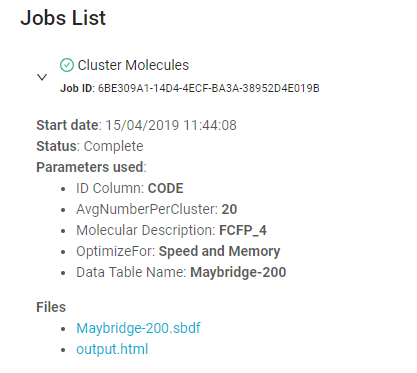
Here you can see all the jobs that you have launched and those which are still running. Each job status is indicated next to it, whether it is running, has run successfully or failed. Click on a job to expand its details like the status, the parameters that were used to run it and the output files.

The output files are those that have been generated by the protocol. As you can see, we have a Maybridge-200.sbdf file (the data table updated with the new columns) and an output.html file. This HTML file is the one that is used to display the molecules we saw earlier. It also contains the instructions generated by the Connector components (add the new columns and the bar chart) which have been translated to JavaScript (we will get back to that later). You can see the result again by clicking the "Load Results" button.
Note that you can also reopen the form that was used to run the protocol with the exact same parameters. This can prove handy when you have a large number of parameters and want to rerun the protocol while only changing one of them.
Protocol Shortcut Link
When running the protocol, you may have noticed a section under the submit button called "Shortcut Link". From there you can generate a link to the current protocol that will allow you to reload the form with the exact same parameters you have when clicking the "Get Shortcut Link" button. This can be useful if you have a protocol that you always want to use with the same parameters, or if you want to share the filled form with a colleague. Furthermore, ticking the "Auto Submit" option will trigger the submit of the form as soon as the page loads from the link.
Managing protocols
The ability to add, update and remove protocols is defined by the user's permissions in Pipeline Pilot (see "Installation" above).
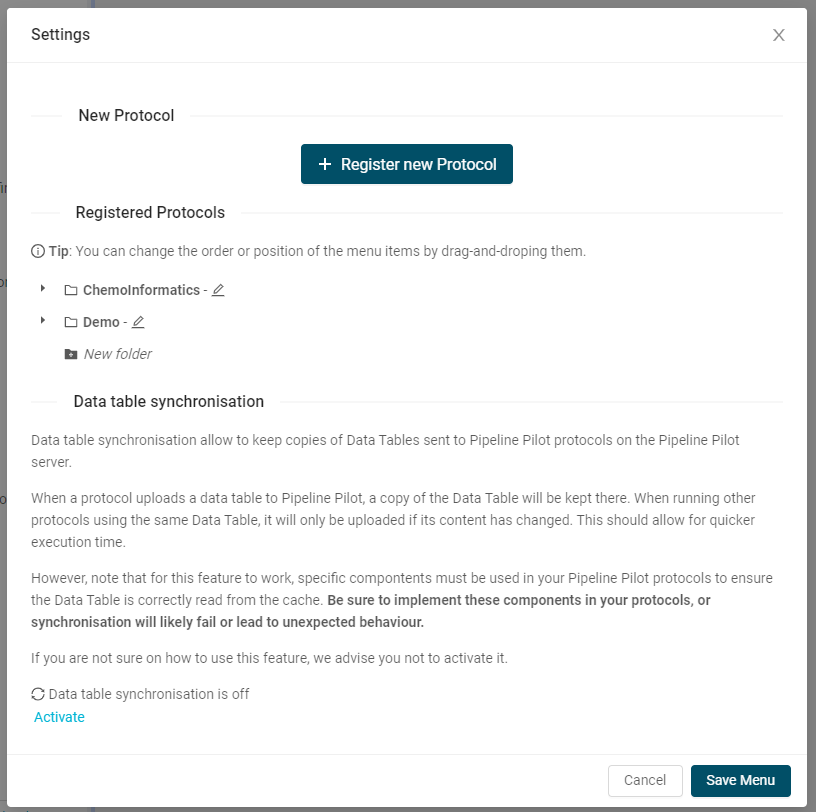
The SWAPP_ADD permission will allow a user to add a new protocol. SWAPP_EDIT and SWAPP_DELETE allow a user to edit or delete protocols already registered in the SWAPP. All these actions can be performed from the Settings Menu


Real Time Synchronization
The SWAPP embeds the Real Time Synchronization API of the Connector. The Real Time Synchronization ensures that your Data Table are kept in sync between TIBCO Spotfire® and Pipeline Pilot and are only uploaded when necessary. You can opt in/out by clicking on the toggle button in the settings menu.
Registering a new protocol
See the corresponding tutorial.
Advanced options
Some fields, like the TIBCO Spotfire Column one, have extra options. You can find their explanations in the List of inputs below.
For the protocol two options are available.
- Automatically Add GUID column: this option will enforce the creation of a column called TSC_ROWID which will contain a unique ID for each row. A unique column is required when running a protocol to merge the resulting data table with the input one. Furtherwmore, having a unique ID per row for each data table ensures you don't have duplicates. This will be particularly useful if users trigger long running jobs when they can lose track of which input data table was used. Note: this option will be set by default if the registered protocol contains a TIBCO Spotfire Column field with the same parameter active.
- Hide item from general users: When a protocol is being developed, you may not have the correct settings right away. Ticking this option will make the protocol only visible to users with the Add, Edit or Delete permission. In the menu, they will exhibit a flask icon to indicate they are under development.
Writing new protocols
How does it work?
The idea behind the SWAPP is fairly simple. We write protocols in Pipeline Pilot which output an HTML file, this file is read by the SWAPP and parsed in the result page. Under the hood, the example protocol we have just registered takes advantage of the Connector 5 API and its components.

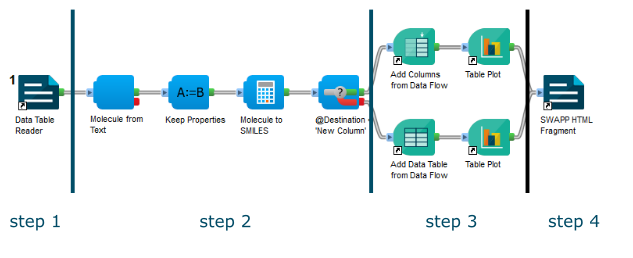
The protocol can be split into 4 steps.
- We use the "Data Table Reader" component. Each row will be read and passed to the next component.
- We process each row, calculate SMILES and add it to the input data.
- Depending on the user's choice, we either add the new columns to the input table or add a new table. Let's focus on the first option. We subsequently call the Add Data Columns Template and Table Plot components which respectively add the new columns and draw/update the Table plot.
- The Spotfire State to HTML component is used to translate all the instructions from the Connector Components to the corresponding calls of the Connector JavaScript API. The output HTML and javascript are written into an output.html file. This file will be loaded by the SWAPP, its HTML displayed in the result page and its JavaScript executed.
Pipeline Pilot Components
The SWAPP is bundled with a few components to manipulate the data easily.
 Data Table Reader
When using the "TIBCO Spotfire Data Table" input type, the Data table selected by the user will be uploaded to the job directory or synced if the Real Time Synchronization is on. This component takes as input parameter the name of the data table and will simply retrieve the uploaded SBDF file from the relevent source.
 SWAPP HTML Fragment
This component is used to compile all the calls from the Connector 5.0 components to HTML and javascript. You can chose to either create an HTML file automatically or use the generated HTML in the pass port if you wish to use it further. If you use any of the Connector components in your protocol, the SWAPP HTML Fragment component must be used for the SWAPP to be able to execute your updates.
 Send Options to SWAPP Form
When using a REST API Resource input type, you can specify a Pipeline Pilot protocol as endpoint for the API Resource. When doing so, the protocol must be callable through HTTP and must return a JSON response containing either an Array of values (number or strings) or an array of objects with at least a value key and optionally a label key. To help you implement the response, you can use the Send Options to SWAPP Form component and pipe it all the records you want to send, with at least a value parameter specified. Then, simply define a Result Parameter in the Web Service tab of the protocol settings with the same name as that you used in the Send Options to SWAPP Form, and with type Byte Array.
You can find example REST Endpoints in the SWAPP Examples folder, like REST Resource and REST Resource for Property Calculation.
More detailed instructions can also be found in the tutorial.
 Update Synchronization Cache Data
When using the Real Time Synchronization, Data tables are uploaded to Pipeline Pilot and kept in sync in the cache. If your protocol updates your Data Table, for example by adding columns, the next call to the Real Time Synchronization API will cause the whole Data Table to be synced with Pipeline Pilot. To prevent this and speed up your protocols, you can use the Update Synchronization Cache Data component to enforce caching data once it has been modified. You can find example usage in the Example Protocols of the SWAPP.
SWAPP Protocols
Example Protocols are available under Protocols\Discngine\TIBCO Spotfire Enabled Protocols\Client Automation\SWAPP Examples. Those are good starting point to help you understand the way the SWAPP proceed.
Template Protocols can be used by clicking File > New Protocol from Template and selecting a protocol from the 'Discngine SWAPP' folder.
List of inputs
- Multi Checkboxes, available for array of defined values.
- Multi Selection, available for array parameters.
- Yes/No Toggle, available for Boolean fields.
- Hidden field, available for all non-required parameters.
- Multi Select, select with creation of options, available for array parameters without defined values.
- Select, available for array parameters with defined values.
- Long Text, available for string parameters with no defined values.
- Text, available for string parameters with no defined values.
- Number, available for float or integers parameters. Note that Pipeline Pilot enforces a value between -2,147,483,648 and 2,147,483,647.
- Radio Select, available for String with a list of allowed values.
- Password, available for string parameters with no defined values.
- Molecule, available for string parameters with no defined values. Depending on the environment and browser, you will have the choice between Ketcher and Biovia Draw. The output will be the CTAB of the molecule.
- File(s) to upload, available for string or array of string parameters with no defined values. The user will be prompted to select one or more file(s) from his/her computer and those files will be uploaded in the Pipeline Pilot's job directory, in the
/tempfolder. - TIBCO Spotfire Data Table, available for string parameters. The data table will then be uploaded as an SBDF file readable with the Data Table Reader component. The parameter itself will contain the name of the data table.
- TIBCO Spotfire Column, available for string parameters. Intended to work alongside TIBCO Spotfire Data Table. You will have the option to specify a filtering method or to use the auto-generated "TSC_ROWID" column which contains a unique value for each input row.
- TIBCO Spotfire Marked Rows, available for array of strings or numbers. The output array will contain the values from the selected column of the data table.
- TIBCO Spotfire Marking, available for string parameters. The output will be the marking name.
- TIBCO Spotfire Document Property, available for string parameters. The output will be a document property's name, value or name concatenated with value, depending on the option chosen at registration.
- REST API Resource, available for strings, numbers or array of strings or number with no defined values. The specified endpoint must return a JSON response containing either an Array of values (number or strings) or an array of objects with at least a value key and optionally a label key. See the tutorial to learn how to use it.
- Group Field, available for group of parameters. There is no output.
- Collapsible Group Field, available for group of parameters. There is no output.
Known limitation
When the Real Time Synchronization is activated, the "Mark rows only" option will not be taken into account. This limitation will be addressed quickly.
Troubleshooting
CORS issue on Firefox or with OPTIONS request
Firefox enforces a strict policy on OPTIONS request. If the requests fail to succed, it is likely due to the server not being configured to allow OPTIONS request. To fix this, two httpd.conf files need to be modified.
First, go to the PPS installation folder, and under [PPS]/install/templates, open the file httpd-pipeline-pilot.conf.
Look for <Location /auth>, the section should look like:
<Location /auth>
    AuthType SES
    Require valid-user
    # Return Basic Auth header with default name
    AuthName "AEP Services"
    # except don't return header for web browsers
    BrowserMatch ^Mozilla SESNoBasicAuthHeader
</Location>
Change it to wrap the content in <LimitExcept OPTIONS>:
<Location /auth>
    <LimitExcept OPTIONS>
        AuthType SES
        Require valid-user
        # Return Basic Auth header with default name
        AuthName "AEP Services"
        # except don't return header for web browsers
        BrowserMatch ^Mozilla SESNoBasicAuthHeader
    </LimitExcept>
</Location>
Do the same for the section <Location /scitegic-bin> and change it to wrap it in <LimitExcept OPTIONS>:
<Location /scitegic-bin>
    <LimitExcept OPTIONS>
        AuthType SES
        Require valid-user
        SESAuthCookieCheckOnly On
    </LimitExcept>
</Location>
Follow the same procedure to update the file httpd-pipeline-pilot.conf located in apps/scitegic/core/packages_win64/apache/httpd-2.4.20/conf
Once done, restart Apache and Tomcat servers